

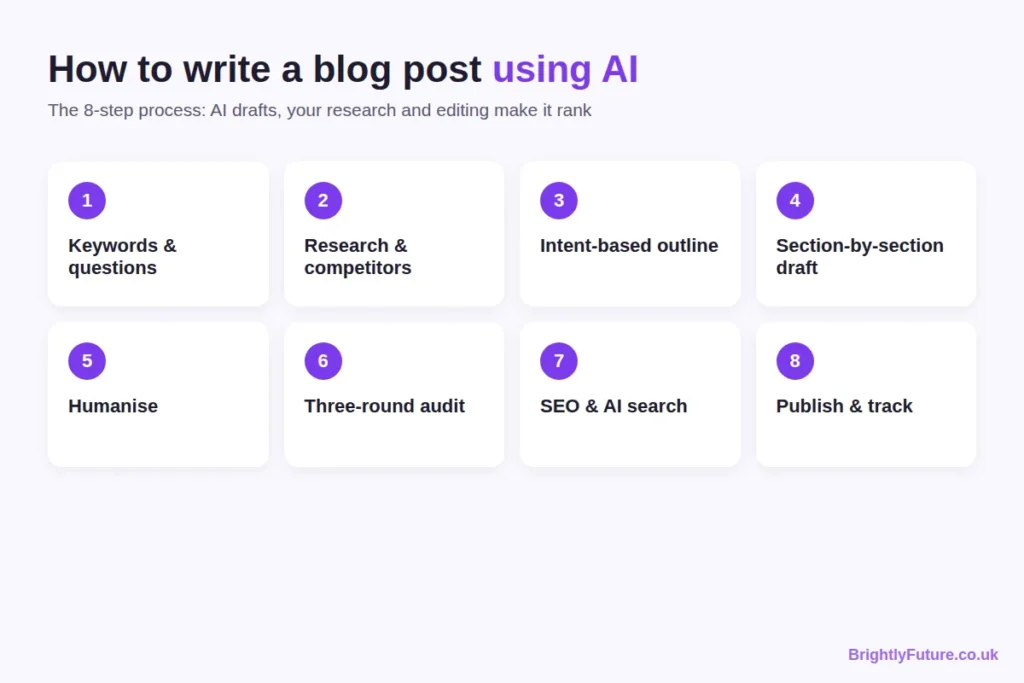
Research keywords and competitors first, build an outline around what the searcher needs, then have AI draft one section at a time from a detailed brief. Audit the draft in three rounds, add your own experience, optimise for SEO and AI search, and verify every claim before publishing.
Almost every blogger uses AI now. Orbit Media’s 2026 survey of more than 1,000 content marketers found that 92.4% use AI for blogging, yet only 13.9% say their blog delivers strong results. The same survey found that using AI doesn’t, on its own, make a blog more likely to perform well.
The difference is the work around the AI. A post drafted in ten minutes from a one-line prompt reads like every other page on the topic. A post built on keyword research, competitor analysis and careful editing can rank. I write that way with Claude, and the health and fitness site I built with this process reached 5,690 clicks and 1.14 million impressions in six months (the Search Console screenshot is in step 8).
This guide covers the full process for one post, with every prompt ready to copy. For the bigger picture, including Google’s rules, other content formats and the wider toolkit, see the complete guide to AI content writing.
What do you need before you start?
You need one AI tool for drafting, one for a second opinion, a keyword tool and about four to five hours per post. Free versions cover every step.
| Job | Tools I use | Free option |
| Drafting | Claude | Claude or ChatGPT free plans |
| Research with sources | Perplexity | Perplexity free plan |
| Second-opinion audit | Gemini or Grok | Both have free plans |
| Keyword research | Semrush and Ahrefs | Google Keyword Planner |
| Question research | Google “People Also Ask”, FindQuestion | Both free |
| Readability | Hemingway, Yoast | BrightlyFuture Readability Checker |
Paid tools save time but aren’t required. Tests of free and paid options are in the best AI blog writing tools.
Step 1: How do you choose a topic and keywords?
Start with a problem your readers actually have, then use keyword tools to confirm people search for it. The keyword validates the topic; it doesn’t create it.
Use this prompt to get a starting list:
Prompt: topic ideas. “I run a [your niche] blog for [your audience]. Give me 10 blog post ideas that solve a specific problem my readers face. Focus on topics a beginner would search Google for help with. For each idea, include the reader’s likely search query.”
Then validate the ideas with keyword data:
- Run each topic through two tools. I use Semrush first, then Ahrefs, because each finds keywords the other misses. Filter for low keyword difficulty and long-tail phrases.
- Merge the lists. Copy both keyword sets into one spreadsheet and remove duplicates.
- Check the intent. Search the keyword yourself. If the results are product pages or tools, a blog post won’t rank there.
- Favour long-tail phrases on a new site. “How to write a blog post using AI” is far easier to rank for than “AI writing”, and the person searching it is ready to act.
No paid tools? Google Keyword Planner gives search volume ranges for free.
Finally, collect the questions people ask. Add every relevant question from Google’s “People Also Ask” box to the spreadsheet, then run the topic through FindQuestion for question-based queries keyword tools miss. These questions become your H2 headings and FAQs.
By the end of this step you have one sheet of long-tail keywords and real questions. Every heading in the article should trace back to it.
Step 2: How do you research the topic and competitors with AI?
Use AI to gather and organise information quickly, then check every fact yourself. AI tools invent statistics and cite sources that don’t exist, so nothing goes into the article unverified.
Gather the basics
Prompt: research. “I’m writing a blog post about [topic]. Give me: (1) the 5 most important points to cover, (2) 3 common misconceptions readers have, (3) 5 relevant statistics with their sources, and (4) what most articles on this topic get wrong or leave out.”
Perplexity works well here because it links to its sources, which makes checking faster.
Analyse the top 10–12 competitors
This is the step most guides skip. Search your main keyword, collect the 10–12 articles that rank, and give them to Claude:
Prompt: competitor analysis. “Act as an SEO expert and keyword researcher. I want to write an article on [topic] as part of my [pillar topic] cluster, and I want to cover it completely. Here are 10 competing articles: [links or pasted text]. Analyse them, extract their long-tail and short-tail keywords, list the entities and facts they cover, find the gaps, and suggest 1–2 unique angles that would let my article outperform them.”
Some sites block AI tools from reading their pages. When that happens, copy the article text and paste it into the chat. It takes an extra minute, and skipping a competitor means writing blind.
Then ask for what the competitors don’t have yet:
Prompt: follow-up research. “Now find: (1) studies and research on this topic published in the last two years, (2) emerging subtopics competitors haven’t covered, (3) People Also Ask questions and related searches, and (4) expert opinions or data points no competitor mentions. Give the source link for each.”
Verify every statistic
Search for the original source of every number the AI gives you. If you can’t find it, delete it. Link to the original study, not to a blog post that quotes it.
Pick your angle
Separate what every competitor covers (you need it too) from what none of them cover (your chance to add value). Pick the strongest gap and make it a full section.
By the end of this step you have a keyword sheet, a competitor gap analysis, verified data and at least one angle your competitors missed.
Step 3: How do you build an outline around user intent?
Give the AI your research and ask it to order the article by what the searcher needs first, not by what’s easiest to write. A detailed prompt gets a usable structure in under a minute.
Prompt: article structure. “You are a senior content strategist. Using the competitor analysis above (entities, gaps, keywords, unique angles), create the final article structure. Open with what the searcher wants, not history or definitions. Order sections by urgency: what they need first, what helps next, what deepens understanding last. Every H2 must answer a specific question; if it doesn’t, cut it. For each section, give the format (paragraph, table, comparison or steps) and a word range. Mark 2–3 sections that need a 40–60 word direct answer at the top. Flag where a study or named source should be cited and where internal links fit. Add 4–6 FAQ questions from the gap analysis whose answers are NOT covered in the main content.”
Review the outline before writing anything:
- Reorder sections to follow how a reader thinks about the problem.
- Cut sections that repeat the same point in different words.
- Add a section from your own experience or a gap the AI missed.
- Give each H2 a different long-tail keyword or question.
- Use a table wherever you’re comparing options.
Plan a Quick Answer of 40–50 words at the top of the article now. It gives Google AI Overviews and featured snippets a ready-made answer to quote, and it fits better when you plan it in from the start.
Step 4: How do you write the draft with AI?
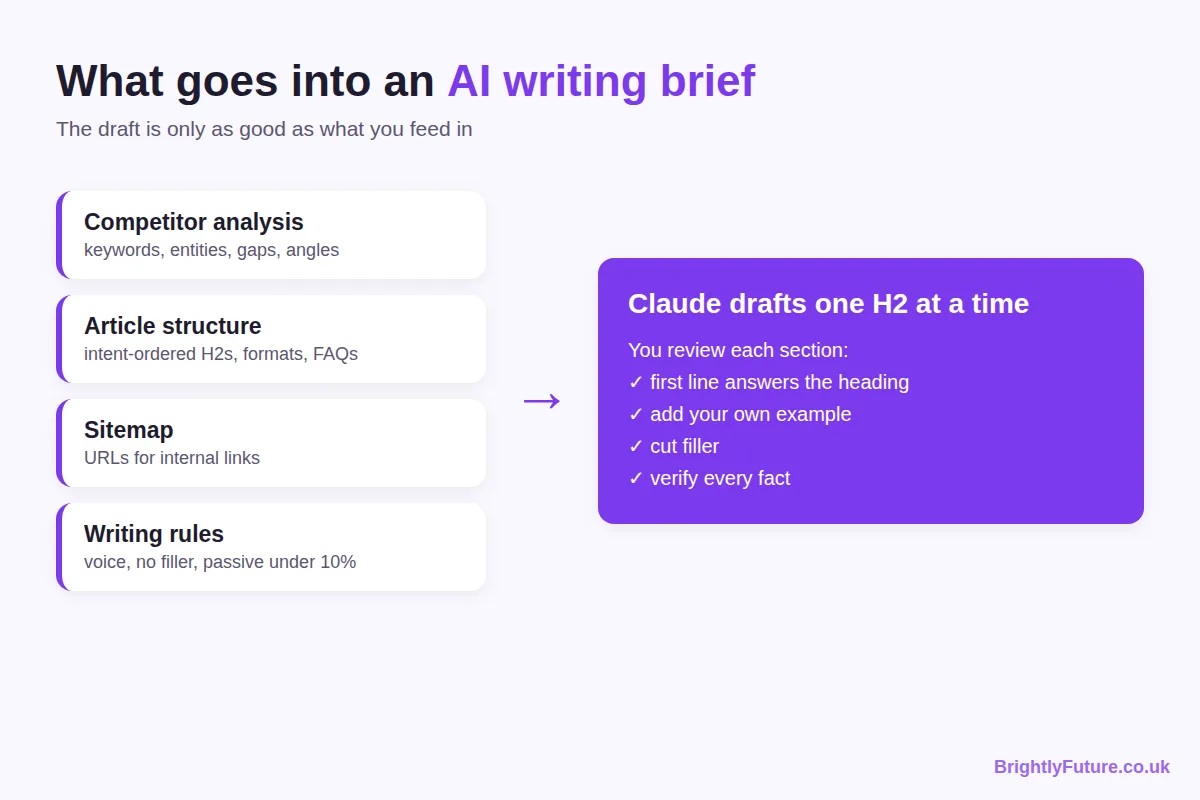
Give the AI both your research and your outline in one brief, then draft one section at a time. Asking for a whole article at once produces generic text that drifts off topic.
The main writing prompt
This is the brief I give Claude for every article:
Prompt: content writing. “You are writing an article for [site name]. Use both inputs: (1) Competitor analysis data: [paste], (2) Article structure: [paste]. Sitemap for internal links: [paste your URLs]. Place the data naturally and use every keyword that fits naturally; do not force any. Focus on quality, not word count. Write with an expert’s voice, but never write ‘as an expert’ or similar. Avoid AI wording, AI tone and filler. Keep the flow unbroken: every section and every line must serve the reader’s question. Keep SEO, AEO and GEO in mind. Use short, clear paragraphs and keep passive voice under 10%. Write one H2 at a time and wait for my review. If you miss any of these instructions, tell me at the end.”
To avoid repeating these rules for every article, save them once. In Claude, I keep them as project instructions plus a writing skill, so every draft starts with the same voice and formatting rules.
Prompts for individual sections
Use these when a single section needs a rewrite or more depth:
Prompt: body section. “Write 200–300 words for the section [H2 heading]. Cover: [bullet points from the outline]. Answer the heading’s question in the first sentence. Use 2–3 sentence paragraphs and one specific example. Tone: direct and practical. No filler phrases.”
Prompt: example. “Give me a real-world example of [concept]. Make it specific, with names, numbers or a scenario a reader can picture. Under 100 words.”
Prompt: transition. “Write a 1–2 sentence bridge between [section A] and [section B]. Avoid ‘Now that we’ve covered’ and ‘Let’s move on to’.”
Prompt: conclusion. “Write a 4–5 sentence conclusion for a post about [topic]. State the main takeaway in one sentence and give one action the reader can take today. Don’t start with ‘In conclusion’.”
Prompt: introduction (write it last). “Here is the finished article: [paste]. Write a 3–4 sentence introduction that states the reader’s problem and the single most useful thing this article gives them. Start with a fact or a direct statement, not a question. Avoid ‘In today’s world’.”
Write the introduction last. An intro written first promises things the body drifts away from; written last, it can open with the post’s strongest point.
After each section
- Check the first sentence. It should answer the heading’s question directly. If it doesn’t, rewrite it yourself.
- Add what the AI can’t. Drop in a personal example, a real number, a tool name or a scenario you’ve seen.
- Cut filler. Delete phrases like “it’s important to note” and “as we discussed earlier”.
- Read the join. Read the last line of the previous section and the first line of this one together. If it jumps, add a bridge.
- Check every fact. If the AI added a statistic, verify it or delete it.
Step 5: How do you make the draft sound human?
Edit it the way you’d edit a ghostwriter: keep the structure, replace the voice. Add at least one real experience, vary sentence length, replace hedging with clear opinions, name specific tools and numbers, and read the draft out loud.
Each of these is covered with before-and-after examples in how to humanize AI content. For a sentence that still sounds stiff after editing, the free AI Paraphraser offers alternative wording, but it can’t add ideas the draft is missing.
Step 6: How do you audit AI content before publishing?
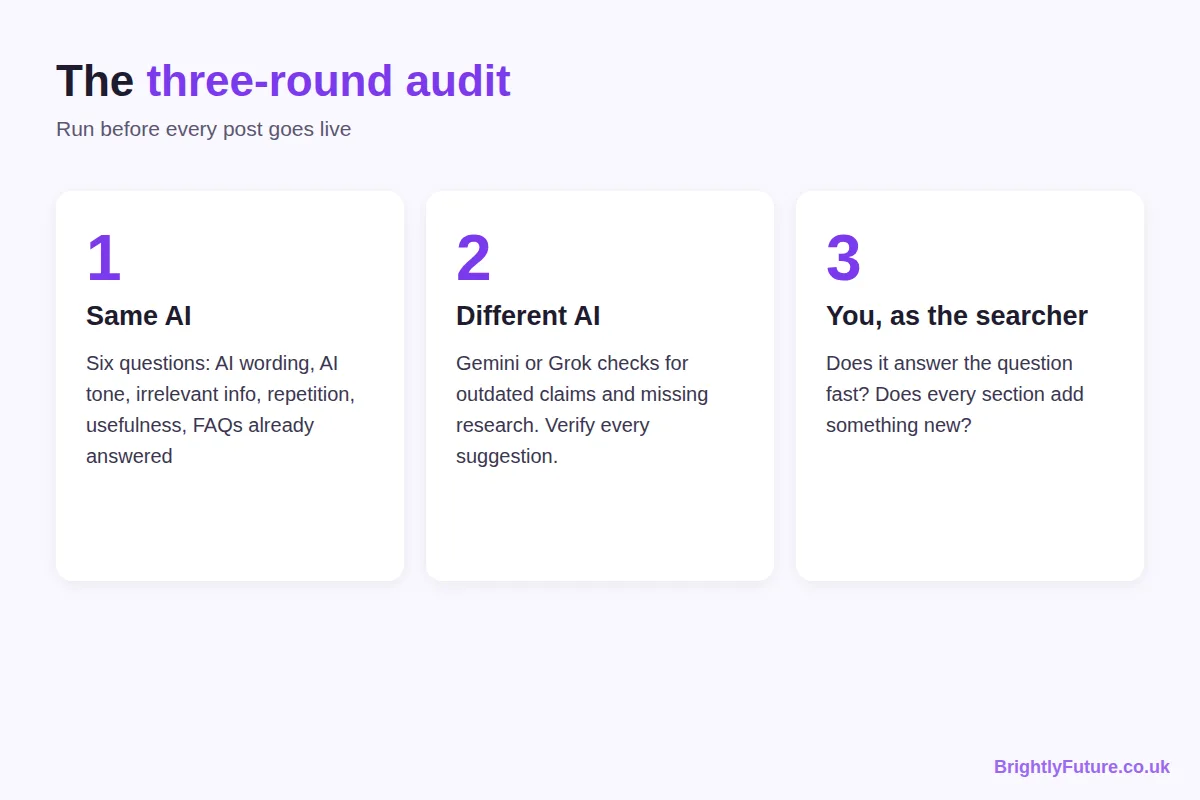
Run three rounds of checks. After an hour with a draft, you stop noticing its repeated phrases and weak sections, so each round looks at the article with fresh eyes.
Round 1: ask the AI that wrote it
Go back to the same chat and ask:
Prompt: self-audit. “Check the full article and answer honestly, with line references: (1) Have you used any AI wording? (2) Have you used an AI voice or tone? (3) Is there any irrelevant information? (4) Are any words or lines repeated without a reason? (5) Is every section useful to the reader? (6) Are any FAQ questions already answered in the article?”
The last question matters more than it looks. An FAQ that repeats the body adds nothing, so replace it with a question the article doesn’t answer.
Round 2: cross-check with a different AI
Paste the finished article into a different tool, such as Gemini or Grok, and ask it to check whether the content reflects the latest research and whether anything important is missing. A tool that didn’t write the draft spots outdated claims and gaps the first one skipped. Verify each suggestion before accepting it; AI tools suggest wrong fixes as confidently as right ones.
Round 3: read it as the searcher
Search the target keyword, then read your article as that person. Does it answer their question in the first few seconds? Does every section teach something new? Would you bookmark it or go back to Google? Cut anything that makes you think “I’ve already read this”.
Before publishing, you can also run the draft through our AI Content Detector to see which sentences read as machine-written. Treat it as an editing hint, not a verdict.
Step 7: How do you optimise the post for SEO and AI search?
Check each on-page element below before you publish. Together they take about 20 minutes.
| Element | What to do |
| Title tag | Primary keyword near the front, under 60 characters, specific about what the reader gets |
| Meta description | 140–155 characters that sell the click and include the keyword naturally |
| URL slug | Short and descriptive: /blog/how-to-write-blog-post-using-ai/ |
| Headings | One H1; H2s for main sections, each targeting a different question; H3s for subsections |
| First 100 words | Primary keyword used naturally |
| Images | Original diagrams or screenshots, descriptive file names, alt text, compressed WebP |
| Internal links | 3–5 links to related articles and tools, with descriptive anchor text |
| External links | Link each statistic to its original source |
| Schema | Article schema, plus FAQ schema for the FAQ section (Rank Math or Yoast) |
| Readability | Short paragraphs, active voice, Flesch Reading Ease above 60 |
Two items need more than a checkbox:
- Headline. It decides whether anyone clicks. Test variations with the free Headline Analyzer, and see how to write blog headlines for the formulas that work.
- Readability. Check the score with our Readability Checker; how to improve your blog readability score explains what to change when it’s low.
Decide image placement after the content is finished and audited. Comparisons, step-by-step processes and data-heavy sections almost always benefit from a visual.
For AI search. Google AI Overviews, Perplexity and ChatGPT quote sections that stand on their own. Put a 40–60 word direct answer under each main H2, name specific tools and sources instead of “a recent study”, and add FAQ schema. The AI content writing guide covers AI search in more depth.
Step 8: How do you publish and track the post?
Publish, submit the URL in Google Search Console with the URL Inspection tool, then track results for at least 30 days before judging the post.
Track these in the first one months:
- Search Console: impressions, clicks and average position for the target keyword and the questions in your keyword sheet.
- Analytics: organic sessions and engaged time on the page.
- New queries: the searches the post starts appearing for. They show which sections to expand.
Impressions usually come before clicks. A new post often appears for dozens of queries at low positions before it climbs.
This is what the process produced on a health and fitness site, with every article researched this way and drafted with Claude:

*Health and fitness site, 29 March to 28 September 2026: 5,690 clicks, 1.14 million impressions, 0.5% CTR, average position 7.7. On the best day, 28 September, it got 125 clicks from 26,201 impressions.*
The first two months show almost nothing, which is normal for a new site. Growth started in June and kept rising as more articles were indexed and climbed.
If a post isn’t ranking after 60 days, check two things: does it fully match the intent behind the keyword, and does it offer something the top three results don’t? Fix those gaps, update the post and request indexing again.
How long does each step take?
About four to five hours per post. Orbit Media’s 2026 survey puts the average blog post at 3 hours 20 minutes, and found that bloggers who spend 6+ hours on long posts are roughly twice as likely to report strong results. Time spent on research and editing pays off.
| Step | Time |
| Keywords and questions | 30–45 minutes |
| Research and competitor analysis | 60–90 minutes |
| Outline | 15–20 minutes |
| Section-by-section drafting | 45–60 minutes |
| Humanising and three-round audit | 60–90 minutes |
| SEO, images and publishing | 30 minutes |
Does Google penalise AI-written blog posts?
No. Google’s spam policies target thin, mass-produced pages, not the tool that drafted them. An edited post that adds something new is treated like any other. What detectors can and can’t spot is covered in can Google detect AI content, and how edited AI content compares with human writing in AI blog writer vs human writer.
Frequently Asked Questions
How long should an AI-written blog post be?
As long as it takes to answer the question fully. Look at the top five results for your keyword: if they all run past 2,000 words, a 600-word post probably won’t satisfy the same searcher. For reference, Orbit Media’s 2026 survey puts the average blog post at 1,312 words.
Can you copyright a blog post written with AI?
It depends on how much of it is yours. The U.S. Copyright Office has said that purely AI-generated text can’t be copyrighted, but human selection, arrangement and substantial editing can be. Rules differ by country, so treat heavy human editing as the safe default. Publishing AI-assisted content is legal.
How many posts can one person publish a week with this process?
Two or three. At four to five hours per post, that’s a solid part-time schedule. Going beyond three a week usually means cutting the audit, and that’s where quality drops first.
How often should you update an AI-written post?
Review it every six months. Replace outdated statistics and tool prices, refresh any section where the search results have changed, and check that internal links still work. Update sooner if Search Console shows the post dropping for its main keyword.
Start with one post this week
Pick one topic from your keyword sheet and follow the eight steps: keywords, research, outline, section-by-section drafting, humanising, the three-round audit, optimisation and tracking. The first post takes longest; by the third, the prompts and checks become routine.
Want to see what a structured first draft looks like? Try the free AI Blog Generator, then use the steps above to turn it into an article worth ranking.